Preparation for the Cleaning Process
Always inspect your connectors or adapters before you begin the cleaning process.
Use the connector housing to plug or unplug a fiber.
Turn off any laser sources before you inspect and clean fiber connectors.
Disconnect the cables at both ends and remove the pluggable receiver from the chassis.
Store unused protective caps in a resealable container to prevent any transfer of dust to the fiber.
Discard any used tissues or swabs.
Fiber Optic Connector Cleaning Procedure
Step 1: Inspect the fiber optic connector, component, or bulkhead with a fiberscope.
Step 2: If the connector is dirty, clean it with a dry cleaning technique.
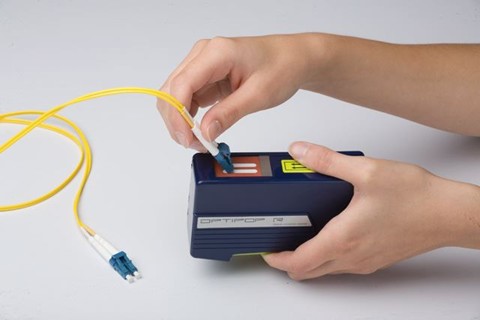
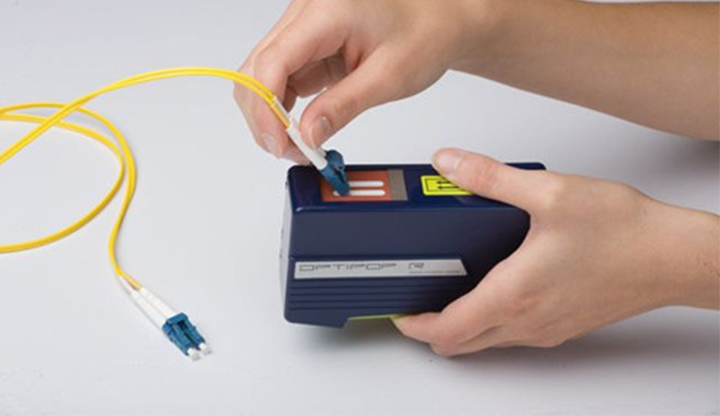
Dry cleaning: Using a reel-based cassette cleaner (see the picture below) with medium pressure, wipe the connector end face against a dry cleaning cloth (single swipe per exposure) in one direction. For angled physical contact (APC) polished connectors, ensure that the entire end face surface mates with the cleaning cloth. Dry cleaning will generally remove airborne contamination and should be attempted first. Inspect the connector end face for contamination after cleaning.
Step 3: Inspect the connector.
Step 4: If the connector is still dirty, repeat the dry cleaning technique.
Step 5: Inspect the connector.
Step 6: If the connector is still dirty, clean it with a wet cleaning technique followed immediately with a dry cleaning in order to ensure no residue is left on the end face.
Wet cleaning: Lightly moisten a portion of a lint free wipe with fiber optic cleaning solution (or > 91% Isopropyl Alcohol) and applying medium pressure, first wipe the end face against the wet area and then onto a dry area to clean potential residue from the end face. For APC polished connectors, ensure that the entire end face surface mates with the cleaning wipes. Wet cleaning is more aggressive than dry cleaning, and will remove airborne contamination as well as light oil residue and films.
Step 7: Inspect the connector again.
Step 8: If the contaminate still cannot be removed, repeat the cleaning procedure until the end face is clean.
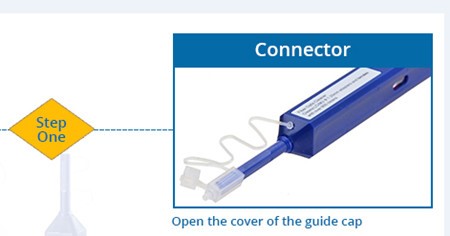
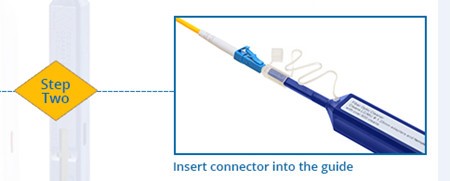
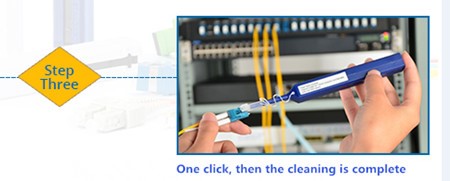
Note: Never use alcohol or wet cleaning without a way to ensure that it does not leave residue on the end face. Or it will cause equipment damage. The following images shows how to use fiber optic cleaner, just three steps will help you out.
Avoid These Common Mistakes
Do not use a cleaning process that will leave a residue on the end-face. Alcohol or wet cleaning processes are the most common procedures that will leave residue on the surface of the devices.
Do not touch the products without being properly grounded.
Do not connect the end face of the fiber connectors.
Do not twist or pull on the fiber cable forcefully.
Do not connect fiber to a fiberscope while system lasers are still on.
Do not touch the cleaned area with a swab, tissue, or cleaning fabric.
Do not reuse any tissues or swabs.
Do not touch a portion of the tissue or swab.
Do not use alcohol around an open flame or spark.
Extend the Life of Your Fiber Optic Connectors With Proper Cleaning Methods
Always extend the life of your fiber optic connectors by using one of these popular cleaning methods. They are safe to use and will prevent premature failure of your devices. Follow the instructions for more stability in your systems.